General
How to retrieve and validate the accuracy of my TIN?
To facilitate the retrieval of Tax Identification Number (TIN), there are multiple channels available for taxpayers:
• Check the TIN via the MyTax Portal (e-Daftar or Your Profile Information).
• Validate the TIN via the Validate Taxpayer’s TIN API before submitting e-Invoice.
• Contact the HASiL Contact Centre (03-8911 1000); or visit the nearest LHDNM offices.
For Individual TIN (with prefix IG):
• The new prefix for individual TIN is now ‘IG’ (replacing ‘OG’ or ‘SG’). For example, if the TIN is ‘SG123456789’, please input it as ‘IG123456789’.
• The numeric character within the TIN remains unchanged, with a maximum length of 14 characters including the prefix.
For Non-Individual TIN (with prefix C, CS, D, F, FA, PT, TA, TC, TN, TR, TP, J & LE):
• If your TIN begins with a zero ’0’ after the prefix, please remove any initial zeros after the prefix for successful validation. For example, if the TIN is ‘C01234567890’, please input it as ‘C1234567890’.
• If your TIN does not end with a zero ‘0’ (e.g., C123456789), please ensure you add an additional zero ’0’ at the end (e.g., C1234567890). Please note that Non-Individual TIN always ends with zero ‘0’.
What are the environment URLs?
| Env | Invoicing Portal | System API | Identity Service |
|---|---|---|---|
| PROD | myinvois.hasil.gov.my | api.myinvois.hasil.gov.my | api.myinvois.hasil.gov.my |
| SANDBOX | preprod.myinvois.hasil.gov.my | preprod-api.myinvois.hasil.gov.my | preprod-api.myinvois.hasil.gov.my |
What are the various document statuses within the e-Invoice workflow?
The invoice is stored in the local database with a specific status. The status is an integer value, which could be one of the following:
| Status | Value | Note |
|---|---|---|
| Submitted | 1 | This means the invoice has passed initial structure validations but is still pending additional validations to be completed |
| Valid | 2 | The status of a successful invoice validation |
| Invalid | 3 | The status of a submitted invoice with validation issues |
| Cancelled | 4 | The status of an invoice cancelled by the issuer |
Can an e-Invoice code or number include special characters?
The system does not restrict the use of any special characters in the e-Invoice code or number.
Application Programming Interface (API)
How to get sample payload?
You can download the JSON and XML Sample payloads for various document types and scenarios from the Sample page.
What is the Rate Limit for each API?
The rate limiting functionality implementation is using the standard HTTP rate limiting headers. Refer here for the rate limit for each API. Hence, the caller should handle the rate limiting headers that are returned to them by the API and retry the call as per these headers. The header would specify the current number of calls that are rate limited and the time period the caller should wait before they make the next call. Please, refer back Standard Headers Parameters to standard rate limiting headers definition.
Common observations:
- Login Too Frequent - The system token is valid for 60 minutes. Use this token for API operations rather than generating a new one for each request. Kindly refer to Login as Taxpayer Notes for more details.
- High Volume Submissions – To maintain system stability, usage limits will be enforced on the Submit Documents. It is therefore advisable to submit e-Invoices in batches and in accordance with the applicable rate limits to prevent potential disruptions. Kindly refer to Submit Document Notes for more details.
What are the Supplier/Buyer Information Field Validation?
| No | Field | Validation Rules |
|---|---|---|
| i | Supplier/Buyer Name | 1) Cannot exceed 300 characters |
| ii | Email Address | 1) Must follow valid format (RFC 5321 & RFC 5322) 2) Maximum 320 characters 3) No space between the characters 4) If no email, just leave it blank |
| iii | Phone Number | 1) Minimum 8 and maximum 20 characters 2) Only allow optional plus (+) symbol at the front of the number 3) No space between the digits |
| iv | Address (Line 1-3) | 1) Maximum 150 characters for every line |
| v | City Name | 1) Maximum 50 characters |
| vi | Postal Code | 1) If country is Malaysia, maximum 5-digit numbers only 2) Country other than Malaysia, maximum is 50 alphanumeric characters including special characters |
| vii | SST Number | 1) Maximum 35 characters 2) Only allows dash (-) and semicolon (;) special characters 3) Up to 2 SST numbers separated by semicolon (;) 4) Allows ‘NA’ value if no SST number |
| viii | TTX Number | 1) Maximum 17 characters 2) Only allows dash (-) special character 3) Allows ‘NA’ value if no TTX number |
Kindly refer to Document Type structure page for more details.
How to Validate TIN using Validate Taxpayer TIN API in Sandbox Environment via Postman
- Choose Sandbox Environment on the top-right option of Postman.
- Login using Login as Taxpayer/Intermediary System API and configure the generated access token accordingly.
- Use the correct format of the API URL and a valid value for TIN, idType and idValue
Example: [GET]
https:///api/v1.0/taxpayer/validate/C12*******0?idType=BRN/NRIC/PASSPORT/ARMY&idValue=19********1.
Which login API should be used by the Taxpayer or Intermediary?
Taxpayers should use the Login as Taxpayer System when submitting their own documents. However, taxpayers who act as service providers, submitting documents on behalf of their customers, should use the Login as Intermediary System.
How to hash the “documentHash” value and encode the “document” value?
The XML/JSON document is hashed using SHA-256 to create the “documentHash” value. The same XML/JSON document would need to be encoded in Base64 to generate the “document” value.
How can the file size of an XML document be reduced if it exceeds the 300KB submission limit?
For cases where an invoice exceeds the 300KB size limit, you may use minification. Minification refers to the process of reducing the size of a file or code without changing its functionality. By removing unnecessary whitespace, comments, and formatting, minification significantly reduces the overall file size while preserving the original functionality of the invoice.
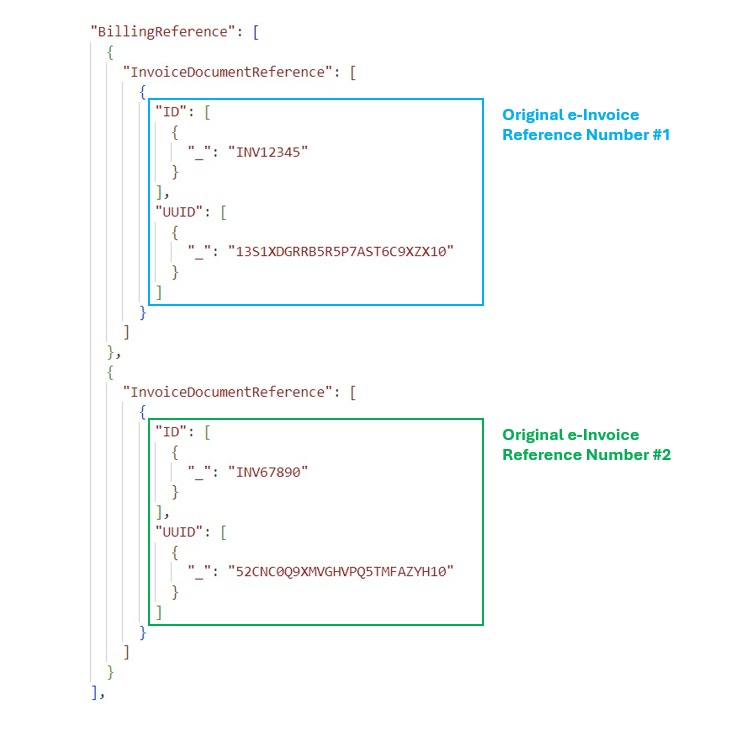
How can I submit a single Credit / Debit / Refund Note that includes multiple Original e-Invoice Reference Numbers (i.e. UUID) through API?
To submit a single Credit / Debit / Refund Note (including self-billed) with multiple UUID through API, please refer to the guidance below:
-
XML file: To add the second Original e-invoice reference, taxpayer will need to add a new line at Billing Reference. It cannot be inserted under the same InvoiceDocumentReference.
Example: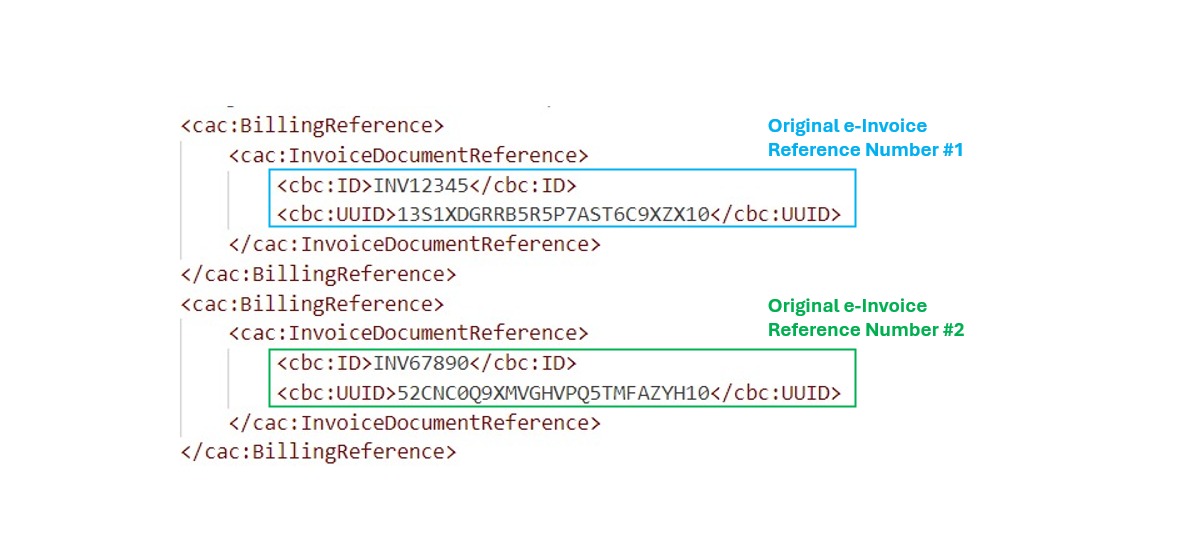
-
JSON file: To add the second Original e-invoice reference in JSON document, taxpayer will need to add a new line at InvoiceDocumentReference.
Example:
What are the differences in printing capabilities between submissions made via API and those made through the MyInvois Portal?
e-Invoices submitted via the API cannot be printed directly from the MyInvois Portal. The printing feature is only available for e-Invoices that are manually submitted through the MyInvois Portal.
Integration Practices
What are the best practices to integrate with API?
Refer to this page for more information Integration-practices.
Should I use a different Client ID and Client Secret for the Production and Sandbox environments?
Yes, you will need to use a different Client ID and Client Secret for each environment. Please refer to the steps on how to obtain Client ID and Client Secret via the MyInvois Portal.
How to obtain Client ID and Client Secret?
Taxpayers may self-provision to obtain the client ID and client secret via the MyInvois Portal. The user guide available on the MyInvois Portal under “View and Register ERP” provides guidance to taxpayers on how to perform the self-provisioning.
What is the reason for having two Client Secrets?
Maintaining two client secrets provides redundancy, with both expiring simultaneously. If one is compromised, the other remains valid, ensuring uninterrupted access and security.
What are UBL JSON Value Mappings?
In the UBL JSON, every attribute value should be paired with a key “_” to be compliant with UBL.
For Example: value for InvoiceTypeCode should be represented as “_” : “02” which refers to the Credit Note Invoice Type code.
How to handle special characters in XML and JSON documents when submitting e-invoices?
For XML document, the following characters need to be replaced with their corresponding escape sequences:
| XML Special Characters | Syntax | Description |
|---|---|---|
| < | < |
Less than |
| > | > |
Greater than |
| & | & |
Ampersand |
| ” | " |
Double quote |
| ’ | ' |
Single quote |
For JSON document, the following characters need to be replaced with their corresponding escape sequences:
| JSON Special Characters | Syntax | Description |
|---|---|---|
| ” | \" |
Double quote |
| \ | \\ |
Backslash |
| / | \/ |
Forward slash |
\b |
Backspace | |
\f |
Form feed | |
\n |
Newline | |
\r |
Carriage return | |
\t |
Tab |
Which Client ID and Client Secret should Intermediaries utilise to submit on behalf of Taxpayers?
Intermediaries should use their own Client ID and Client Secret to submit on behalf of Taxpayers.
How to get validation link and generate QR code?
The QR code (quick response code) can be generated from the validation link using any QR code generator. The validation link can be created using the format below:
{envbaseurl}/uuid-of-document/share/longid
The {envbaseurl} will need to be replaced with e-Invoice portal Base URL. The UUID and long ID can both be obtained as return parameters for Get Submission, Get Document or Get Document Detail API.
Will intermediaries be allowed to view and retrieve e-Invoices received by the taxpayers?
Due to privacy regulations and confidentiality considerations, intermediaries will only be allowed to view and access e-Invoices that they have submitted on behalf of taxpayers. Intermediaries are not permitted to access or retrieve e-Invoices submitted independently by taxpayers or e-Invoices received by taxpayers.
How to get sample payload?
You can download the JSON and XML Sample payloads for various document types and scenarios from the Sample page.
How to test APIs via Postman?
The guidance on how to test the API’s can be found on the Postman Page.
How to get sample response from each API?
You can download the JSON collection file from the Postman page for the sample JSON request. Then, follow the steps on how to test the APIs to get the response for each APIs.
What are the code and value required for tax exemption?
The Software Development Kit (SDK) page and Postman have been updated on 24 May 2024. Tax Exemption code ‘E’ is now added into SDK for Tax Type code. The real value should correspond to the tax type code available at sdk.myinvois.hasil.gov.my/codes/tax-types.
What to do if an Error 400 code appears in API when validating taxpayers’ TIN number?
This API returns HTTP status code 400(BadArgument) if the TIN or any of the input parameters does not match the argument structure. Taxpayers need to check their TIN number format is correct.
What action should be taken if the API displays an error message stating “Unauthorized” or indicates a status of “401 Unauthorized”?
The error occurred because the generated access token expired after its one-hour validity period. To resolve this, a new access token must be generated using the “Login as Taxpayer” or “Login as Intermediary” API once again.
What action should be taken when I encounter Error Code 429 which indicates “Too many requests” on an API?
This issue occurred because the system received too many requests on the API that the taxpayer is using. The taxpayer can resolve this by attempting to use the API again after a brief period.
Can an e-Invoice be issued with a negative value?
Yes. Negative values are allowed for fields within Document Submission.
Is there a limit to the number of buyer email addresses that can be added to the e-Invoice?
No, The MyInvois System supports a single email as long as the field does not exceed the field size limit of 320 characters.
How does the system validate if a document is a duplicate?
The system identifies duplicate e-Invoices by comparing the following fields using the AND operator:
- e-Invoice type and type version
- Issuance date and time
- Internal ID or invoice number
- Supplier TIN (for normal e-Invoices)
- Buyer TIN (for self-billed e-Invoices)
This ensures that an e-Invoice is flagged as a duplicate only if it matches all the above criteria with another e-Invoice already processed by the system within a 2-hour period.
Digital Signature
Where can taxpayers obtain guidance on Digital Signature?
The comprehensive guidance on Digital Signature creation and validation can be found on the Signature page.
How to acquire Digital Signature?
The issuer of the documents will have to use a valid digital certificate that is issued by a certificate authority (CA) in Malaysia as documented here List of Certification Authorities and Recognition.
You may also obtain the digital signature sample from this link:
• UBL 2.1 Invoice Sample XML with Signature: https://sdk.myinvois.hasil.gov.my/files/one-doc-signed.xml.
• UBL 2.1 Invoice Sample JSON with Signature: https://sdk.myinvois.hasil.gov.my/files/sample-ul-invoice-2.1-signed.min.json.
Disclaimer: The sample JSON file is for digital signature illustration purposes only. Taxpayers are advised to consult local laws and regulations for guidance on digital signature implementation.
Which version of Document Types should taxpayers use to test and validate Digital Signature in the Sandbox environment?
Both versions v1.0 and v1.1 are available on the Sandbox. Taxpayers interested in testing and validating Digital Signature should use v1.1 for their Sandbox testing.
What are the key differences between version 1.1 and version 1.0?
Digital signature can only be validated in version 1.1.
Why was version 1.1 introduced?
To allow taxpayers to test the digital signature validation after submitting invoice in the Sandbox environment.
Do I need to submit the documents in version 1.0 and version 1.1?
Taxpayers are given the option to decide to submit documents in version 1.0 or version 1.1 depending on testing requirements. If taxpayers intend to test digital signature, it is recommended to submit using version 1.1. Version 1.0 is available for submission of documents without digital signature validation.
Is the submission using Document Version 1.0 allowed to be used for submission on 1 August 2024 onwards?
Taxpayers may submit documents using document version 1.0 without the requirement for digital signature validation until such time as the Lembaga Hasil Dalam Negeri Malaysia (LHDNM) issues an official notice concerning the retirement of version 1.0. Nonetheless, it is strongly recommended that taxpayers adopt version 1.1, which incorporates digital signature validation, to ensure the authenticity of the supplier’s identity.
How do I ensure the digitally signed document created is valid?
You can refer to the Signature Validation section in the Signature page https://sdk.myinvois.hasil.gov.my/signature/ on how to digitally sign the document, adhering to the digital signing creation requirements and validation rules for signature.
How can I get a valid digital certificate for my organisation?
The certificates must be issued by the certificates authority as listed in the MCMC website at https://www.mcmc.gov.my/en/sectors/digital-signature/list-of-licensees.
What type of digital certificate do I need to procure?
Both Soft and Roaming certificates can be used for MyInvois purpose, depending on your system configuration. Soft certificate is installed in local machine, while Roaming certificate is installed in Server.
For companies that have subsidiaries, does digital certificate need to be registered for each subsidiary?
Subsidiaries have the option to independently procure their own digital certificates for document submission. Alternatively, the headquarters can designate one subsidiary as an intermediary tasked with registering and managing digital certificates for the entire organization, including all subsidiaries.
As a service provider, what type of certificate do I need to procure to submit documents that are digitally signed?
The service provider can procure either Soft or Roaming certificates for MyInvois purpose, depending on the system configuration. Soft certificate is installed in local machine, while Roaming certificate is installed in Server.
As a service provider, do I need a different certificate for each customer I am representing?
No. Service providers can use their own certificate to submit document for all their customers.
Which digital certificate is required for document submission via API: an individual’s or an organisation’s?”
For submission through API, an organisation digital certificate is required.
Do I need to renew a digital certificate?
Yes. The digital certificate has an expiration date. You would need to confirm with the CA that issued the certificate on the expiration date.
Technical Support and Error Handling
What action should be taken when I encounter the submission error “Issuance date time value of the document is too old and cannot be submitted”?
If it pertains to the Submit Document API, review the “propertyPath” for detailed information and adjust the date to ensure it is within 72 hours before submission.
What should I do if I encounter the error “Document issuance date and time is in the future”?
The provided date and time format does not comply with the required UTC standard. To resolve this issue, ensure that the issuance date and time in your document are formatted correctly according to the UTC standard.
What should be done if the submission error message “The authenticated TIN and documents TIN is not matching” occurs?
Kindly verify the following scenarios:
- When using Login as Taxpayer API - the issuer TIN in the document must match with the TIN associated with the Client ID and Client Secret.
- When using Login as Intermediary System API – the issuer TIN in the document must match with the TIN of the taxpayer the intermediary is representing.
- For sole proprietors, taxpayers can now validate TINs starting with “IG” along with their BRN. To do so, taxpayers must ensure the “Business Owner” role is assigned in their MyTax profile.
Why am I receiving a “403 - Forbidden” error when trying to access the Sandbox Environment using the Login as Taxpayer API?
The “403 - Forbidden” error typically occurs when the incorrect Client ID and Client Secret are used. Please note that credentials from the production portal cannot be used in the sandbox environment. To resolve this issue, you need to register your company in the pre-production portal and then register your ERP system. This will allow you to obtain the correct Client ID and Client Secret for accessing the sandbox environment.
Why am I receiving an error message “Invalid Structure” when submitting e-Invoice through the API?
The “Invalid Structure” error message usually appears due to an incorrect sequence of elements in your submission. To resolve this issue, please ensure your submission adheres to the correct format. For reference, please refer to the following sections of the SDK:
-
MyInvois Sample Format: https://sdk.myinvois.hasil.gov.my/sample/
-
MyInvois Document Data Structure: https://sdk.myinvois.hasil.gov.my/types/
Why am I receiving the error stating “ItemCode 00 was not active when document issued”?
The error message “ItemCode 00 was not active when document issued” indicates that the item code ‘00’ was either not defined, inactive, or incorrectly configured in the system’s item master data at the time the e-invoice was submitted. This means the system could not validate the item as active, which is a requirement for successful document processing.
Additionally, please note that the use of state code ‘00’ is no longer valid for issuing e-invoices via API or Batch Upload and refer to the SDK at the following link for the correct list of state codes: https://sdk.myinvois.hasil.gov.my/codes/state-codes/
How can I submit an e-Invoice with multiple tax types through the API?
Multiple tax types can be included by repeating the “TaxSubtotal” element within the line item section.
Why am I receiving the error “Search criteria is not conclusive and more than one TIN can be found to match the search criteria provided, please revise the search criteria” when using the Search Taxpayer’s TIN API, while the MyTax Search TIN function returns a single valid TIN?
You may need to refine or provide more specific search parameters when using the API to avoid ambiguous results. You may refer to the following link for the supported search parameters: https://sdk.myinvois.hasil.gov.my/einvoicingapi/10-search-taxpayer-tin/